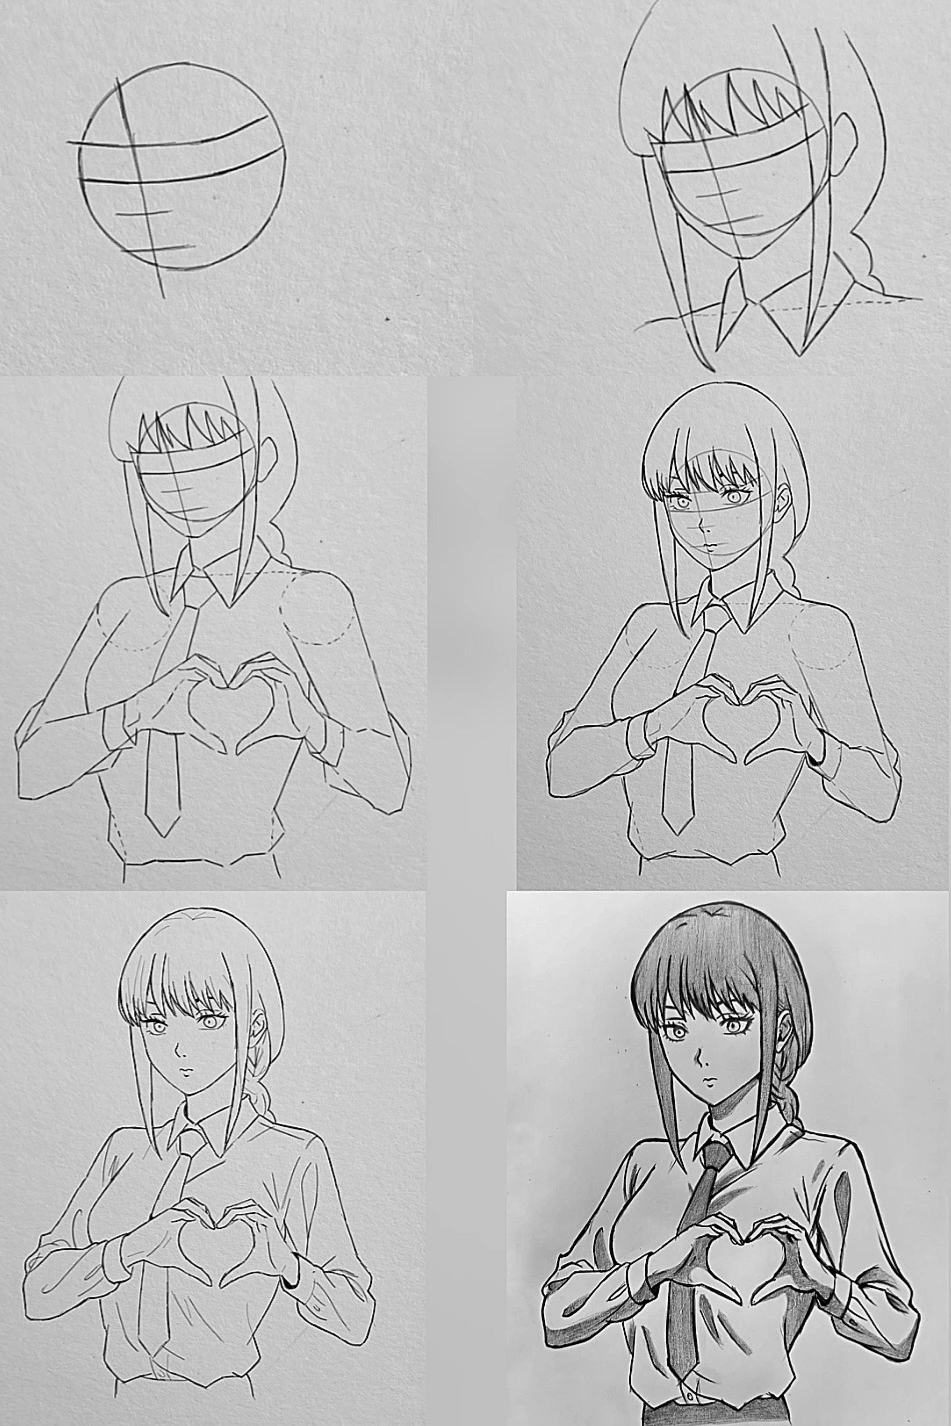
Creating a step-by-step anime drawing of Makima requires a structured construction process and careful refinement at every stage. Based on the image progression, the drawing develops from a simple head base into a fully shaded illustration with depth and clarity. Each phase builds logically on the previous one, ensuring accuracy in proportion, expression, and overall form.
The process begins with constructing the head base. Start by drawing a clean circle to represent the cranium. This circle determines the scale of the character’s head and serves as the foundation for all facial features. Next, draw a vertical guideline through the center of the circle to establish facial symmetry and indicate the direction of the head. In this drawing, the head is slightly turned, so the vertical guideline curves subtly to reflect the perspective. Then add a horizontal guideline across the upper third of the circle to mark the eye line. Lightly sketch additional horizontal guides below it to indicate approximate nose and mouth placement. These guidelines ensure that the facial features remain aligned and proportional throughout the process.
Once the circular base is complete, extend downward to form the jaw and chin. From the lower sides of the circle, draw two gently tapering lines that converge into a soft, pointed chin. Makima’s facial structure is slender and refined, so avoid overly sharp angles. The chin should sit roughly half the circle’s height below the base, maintaining realistic anime proportions. Keep these construction lines light so they can be adjusted later.
With the head structure established, begin developing the hair framework. Makima’s hairstyle features straight bangs across the forehead and long side strands framing the face. Start by sketching the outer silhouette of the hair, extending slightly beyond the circular head shape to account for hair volume. Draw the bangs as a curved band across the forehead, following the arc of the skull. Then indicate individual hair segments within the bangs using light triangular or tapered shapes. Extend long vertical strands down both sides of the face, ensuring they flow naturally and align with gravity. At the back, lightly outline the braided ponytail to define the rear silhouette without focusing on details yet.
Next, construct the neck and upper body framework. Draw two slightly curved vertical lines descending from the base of the jaw to form the neck. Keep the neck slender but proportional. Add slanted shoulder guidelines to establish posture. Because the character’s torso is angled slightly, one shoulder appears marginally lower than the other. Sketch the upper torso using simplified shapes. Indicate the chest area with soft curves and outline the shirt structure loosely. Light circular guides can be placed at the shoulders to help construct the arms.
Now move to building the arms and hand structure. The hands are positioned in front of the chest, forming a heart shape. Begin by sketching simple blocky shapes for the palms to determine orientation. Then draw the fingers as elongated cylinders, carefully adjusting their angles so the thumbs and index fingers meet to create the heart silhouette. Focus on proportion and alignment rather than detail at this stage. The hands should appear symmetrical and naturally posed.
After the basic structure is complete, begin refining the facial features. Start with the eyes along the horizontal guideline. Makima’s eyes are slightly narrow with a calm, composed expression. Sketch the upper eyelids first, giving them a gentle downward curve toward the outer edges. Add the lower eyelids lightly. Inside the eye shapes, draw circular irises and define the pupils. Ensure both eyes align with the perspective established by the guidelines. Add thin eyebrows above the eyes, keeping them subtle and relaxed. Place the nose along the vertical guideline using minimal lines, typical of anime style. Draw a small, understated mouth centered below the nose, maintaining her neutral expression.
Refine the hair by defining individual strands more clearly. Sharpen the bangs into distinct tapered sections and clean up the long side strands so they frame the face evenly. Develop the braid at the back by dividing it into overlapping segments that interlock in a consistent pattern. Add light internal lines to suggest strand direction, but avoid overcrowding the hair with excessive detail.
Next, define the clothing details. Outline the collared shirt with clear, angular lines. Draw the collar points symmetrically and ensure they rest naturally over the shoulders. Add the tie beneath the collar, beginning with a small knot and extending downward into a tapered shape. Refine the sleeves, indicating folds at the elbows and wrists. Light crease lines around the chest and under the arms help suggest fabric tension and form. Keep folds intentional and directional to avoid a cluttered appearance.
With all elements refined, proceed to clean line art. Carefully erase unnecessary construction lines while preserving the final shapes. Go over the drawing with confident, darker strokes to define the outer contours and important internal details. Vary line weight subtly by thickening the outer edges and areas of shadow while keeping interior details lighter. Clean line art enhances readability and gives the drawing a professional finish.
The final stage involves shading to create depth and dimension. Determine a consistent light source, typically from above or slightly to one side. Begin shading the hair by darkening areas beneath the bangs, along the underside of strands, and within the braid overlaps. Leave highlights where light would naturally hit the top of the head. On the face, add subtle shadow under the bangs, beneath the chin, and along the neck to separate forms. Shade the shirt with soft gradients to indicate curvature, adding darker tones in fabric folds and under the arms. The tie can be shaded more heavily to contrast against the lighter shirt. Finally, apply gentle shadow beneath the hands and along overlapping areas to reinforce depth.
By following these stages—starting with a simple circular base, building structural guidelines, refining facial features, defining clothing, cleaning line art, and applying controlled shading—you achieve a balanced and dimensional anime illustration. Each step contributes to clarity, proportion, and expressive presence, resulting in a polished and cohesive drawing of Makima.