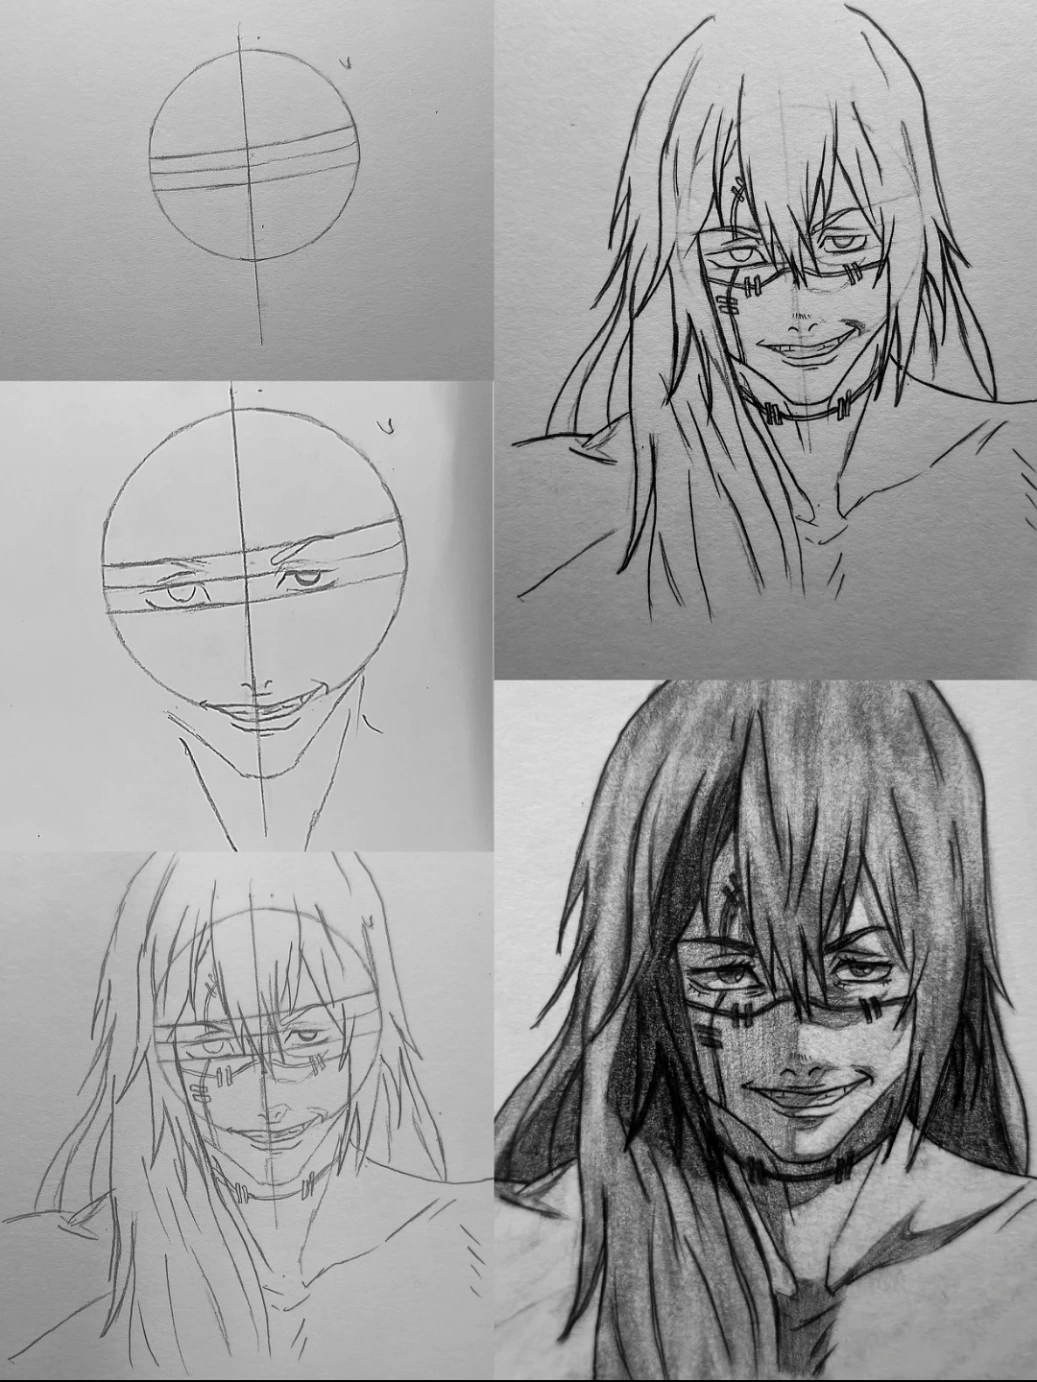
This step-by-step tutorial explains how to draw Mahito from Jujutsu Kaisen, focusing on his sinister expression, stitched details, and dramatic shading.
Step 1: Draw the Base Circle
Begin with a clean circle to establish the head structure. Keep the sketch light. Draw a straight vertical line through the center for facial symmetry and add two slightly curved horizontal guidelines across the upper-middle area to position the eyes.
Step 2: Define the Face Shape
Extend lines downward from the sides of the circle to create a narrow, slightly pointed chin. Mahito’s face is slim and sharp, so keep the jawline refined rather than wide.
Step 3: Sketch the Eyes
Using the upper horizontal guideline, draw narrow, half-lidded eyes. His gaze should look relaxed but unsettling. Add thin upper eyelids and subtle lower lash lines to create that cold, playful expression.
Step 4: Add the Nose and Mouth
Place a small, simple nose along the vertical center line. Then draw a wide, curved smirk slightly off-center to give him that mischievous, sadistic look. Lightly indicate the upper teeth for extra expression.
Step 5: Draw the Facial Stitches
Carefully add stitch marks across the face—on the forehead, across the cheeks, and around the chin and neck area. These stitches are uneven and organic, which makes them look more disturbing and true to Mahito’s design.
Step 6: Outline the Hair
Sketch the hair starting from the top of the head. Mahito’s hair is long and messy, with uneven strands falling over his forehead and one side of his face. Let the hair extend past the shoulders with loose, flowing lines to create movement.
Step 7: Draw the Neck and Shoulders
Add a slender neck and lightly sketch the shoulders. Keep the upper body simple since the focus remains on the face and expression.
Step 8: Refine the Lineart
Erase unnecessary construction lines and darken the final outlines. Sharpen the eyes, mouth, and stitch details to make the expression more intense.
Step 9: Add Shading
Begin shading the hair with smooth, layered pencil strokes, making one side darker for depth. Add shadows under the bangs, beneath the chin, and along one side of the face to create dimension. Light shading around the nose and lips enhances realism while maintaining anime style contrast.
The final result captures Mahito’s eerie charm—his playful yet dangerous smile, stitched skin details, and deep shaded hair combine to create a dramatic and expressive portrait.