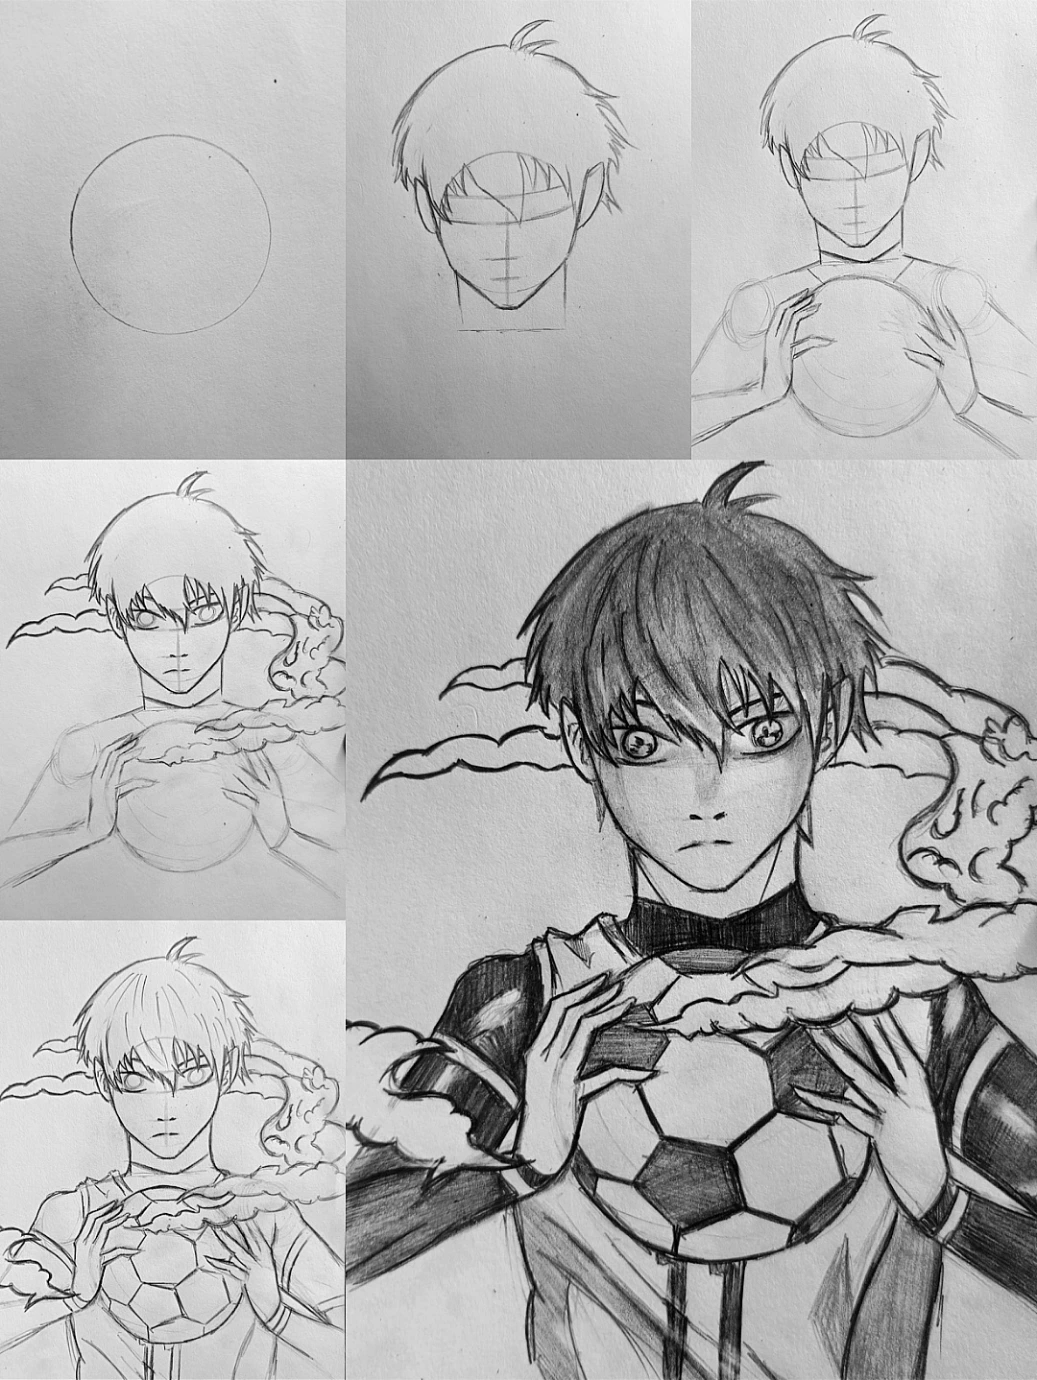
Step 1: Drawing the Head Base
Begin by sketching a clean, balanced circle to represent the cranium. This circle establishes the overall size and proportion of the character’s head. Keep your pencil pressure light so adjustments can be made easily. At this stage, avoid adding any facial details. Focus only on achieving a smooth, symmetrical shape, as this foundation will guide the entire drawing.
Step 2: Adding Facial Guidelines
Draw a vertical line down the center of the circle to define facial symmetry and indicate the direction the head is facing. Then add a slightly curved horizontal line across the upper half of the circle to mark the eye level. Below that, lightly sketch two shorter horizontal lines to suggest the placement of the nose and mouth. These guidelines ensure accurate alignment and prevent distortion as the drawing progresses.
Step 3: Shaping the Jaw and Neck
Extend two angled lines downward from the lower edges of the circle to form the jawline. Bring these lines together into a defined chin, keeping the structure sharp but natural. Nagi’s facial shape is slightly angular, so maintain clean, confident strokes. After shaping the chin, draw two vertical lines beneath it to create the neck. Ensure the neck aligns properly with the center guideline.
Step 4: Building the Hair Structure
Outline the outer silhouette of the hair, allowing it to extend slightly beyond the head circle to account for volume. Sketch uneven, layered spikes around the top and sides to capture Nagi’s slightly messy hairstyle. Add light internal strand indications following the natural direction of hair growth. Keep these lines loose for now, focusing on shape rather than detail.
Step 5: Constructing the Upper Body Framework
Lightly sketch the shoulders using simple curved lines extending outward from the neck. Use circular guides at the shoulder joints to establish arm placement. Draw the upper torso using straight and slightly curved lines to define posture. Maintain proper proportion between head and body, ensuring the torso does not overpower the head.
Step 6: Positioning the Soccer Ball and Hands
Draw a large circle in front of the chest to represent the soccer ball. Make sure it is centered and aligned with the torso. Next, sketch simplified shapes for the hands using block-like forms to establish orientation. Add elongated cylindrical shapes for the fingers, carefully positioning them so they rest naturally around the ball. Focus on proportion and finger spacing rather than detail.
Step 7: Refining Facial Features
Using the eye guideline, draw sharp, slightly intense eyes. Begin with the upper eyelids, giving them a defined, angled shape. Add the lower eyelids lightly. Sketch circular irises and smaller pupils inside, ensuring both eyes align with perspective. Add thin eyebrows above the eyes to enhance expression. Place the nose along the center guideline using minimal lines. Draw a small, neutral mouth slightly below the nose line to maintain Nagi’s calm expression.
Step 8: Adding Energy Effects and Clothing Details
Sketch flowing, smoke-like shapes wrapping around the character and the ball to create a sense of motion and intensity. Keep the forms organic and dynamic. Then refine the clothing by defining the jersey collar, sleeve edges, and subtle fabric folds. Add panel lines or design elements on the shirt to enhance realism.
Step 9: Cleaning the Line Art
Erase unnecessary construction lines carefully. Go over the final outlines with darker, more confident strokes. Slightly thicken outer contour lines to give the drawing stronger definition. Keep interior details lighter for balance. Clean line work significantly improves the overall polish of the artwork.
Step 10: Applying Shading and Depth
Determine a light source, preferably from above or slightly to one side. Begin shading the hair, darkening areas beneath overlapping strands and leaving highlights on the top. Add shadows under the bangs and along the neck to create depth. Shade the soccer ball panels with gradual tonal variation to suggest roundness. Deepen shadows in the clothing folds and beneath the arms. Finally, darken sections of the energy effects selectively to add contrast and drama.
By following these highlighted steps, the drawing develops logically from simple geometric construction to a dynamic, fully shaded anime illustration of Nagi.