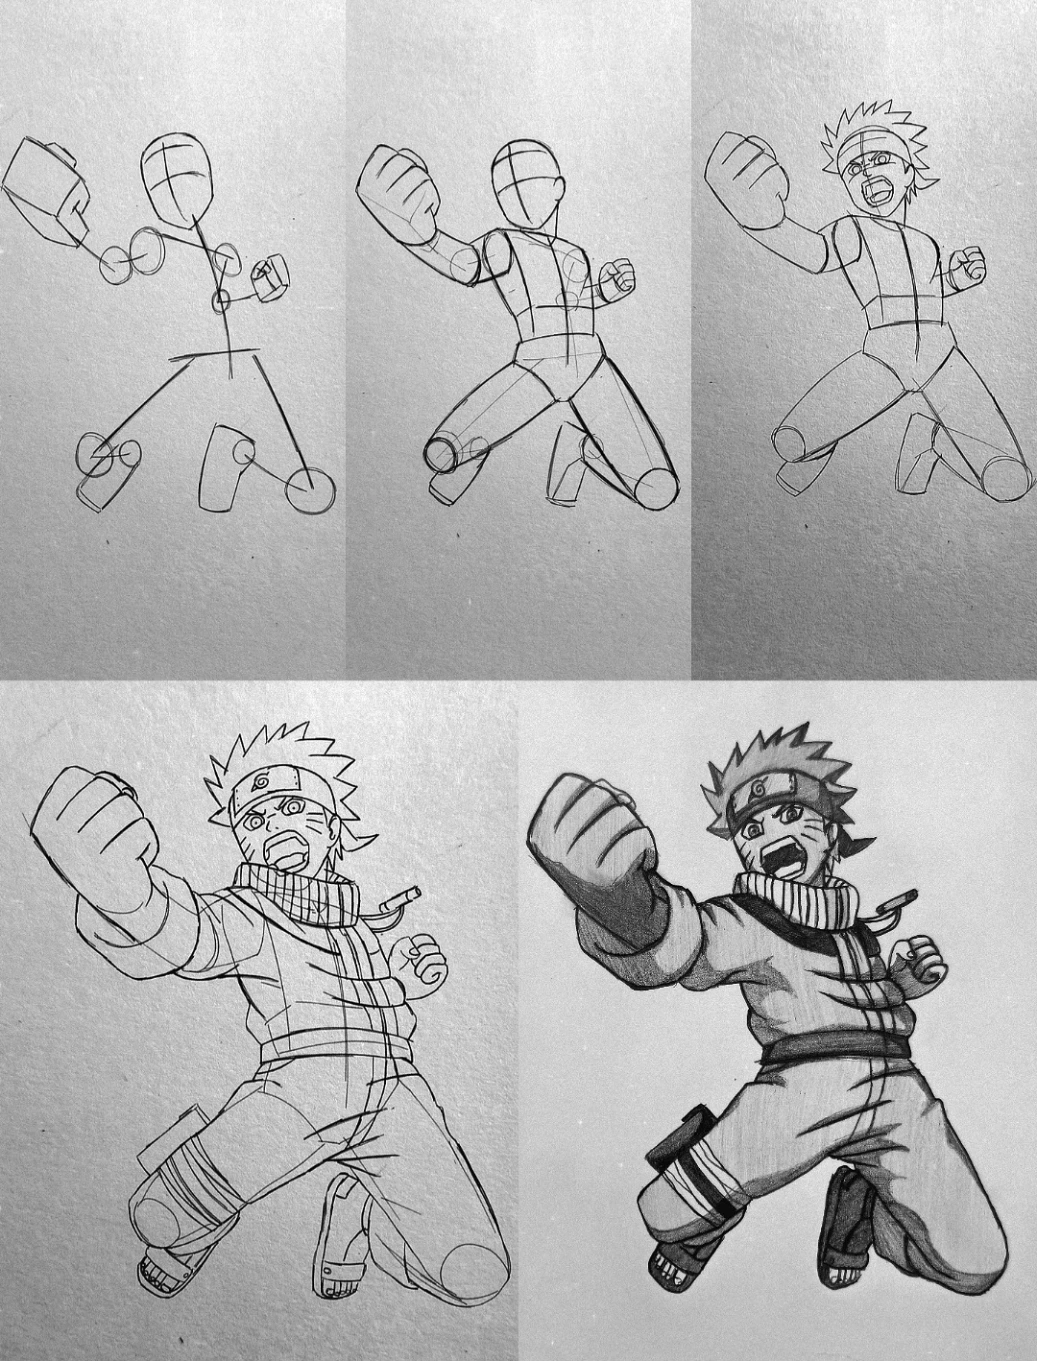
Step 1: Creating the Action Stick Figure of Naruto Uzumaki
Begin by sketching a dynamic stick figure to capture the energy of Naruto Uzumaki. Draw a tilted vertical line for the spine to show forward motion. Add a circle for the head and small circles at the shoulders, elbows, hips, and knees to mark the joints. Connect these with straight lines to form the limbs. Extend one arm dramatically forward for the punch, and spread the legs apart in a mid-air stance. This framework establishes balance, perspective, and action.
Step 2: Building the Basic Body Volumes
Convert the stick figure into solid shapes. Replace the torso line with a block-like form to represent the chest and abdomen. Turn the arms and legs into cylinders, making the punching arm larger to exaggerate perspective. Shape the thighs and calves with rounded forms. The front fist should be oversized compared to the body to create depth and impact.
Step 3: Defining the Torso and Limbs
Refine the chest and waist, narrowing slightly at the midsection to create a heroic silhouette. Clarify the thickness of the limbs and define the knees with rounded joint forms. Shape the punching hand using a box structure for the palm and curved segments for the fingers. Keep the second fist smaller and closer to the body.
Step 4: Constructing the Head and Facial Guidelines
Draw a vertical centerline and a horizontal eye line across the face. Because the head is tilted, curve these guidelines slightly. Shape the jaw into a more angular form. Keep proportions balanced to match Naruto’s youthful but determined appearance.
Step 5: Adding Naruto’s Facial Features and Hair
Sketch sharp anime-style eyes along the eye guideline. Add circular irises and defined pupils. Draw three whisker-like marks on each cheek. Outline the open mouth in a shouting expression. Then add his spiky hair, creating uneven pointed sections radiating outward. Draw the forehead protector band across the head and add the Leaf Village symbol at the center.
Step 6: Detailing the Clothing
Outline the jacket collar and zipper line down the center of the torso. Add folds around the shoulders and waist to show movement. Draw the pants with loose fabric lines and define the knee areas. Sketch the open-toed ninja sandals and add bandage wraps around the lower leg.
Step 7: Cleaning the Line Art
Erase unnecessary construction lines carefully. Redraw the final outlines with darker, confident strokes. Thicken outer contour lines slightly, especially around the punching fist and hair, to enhance depth and focus.
Step 8: Applying Shading and Depth
Decide on a light source from above or slightly to one side. Darken areas under the hair, beneath the chin, and along the underside of the arm. Shade the clothing folds to emphasize volume. Add deeper shadows to the punching arm to enhance the dramatic foreground effect. Keep highlights on raised areas to maintain contrast and dimension.
Following these steps results in a dynamic, high-impact drawing of Naruto Uzumaki in mid-action.