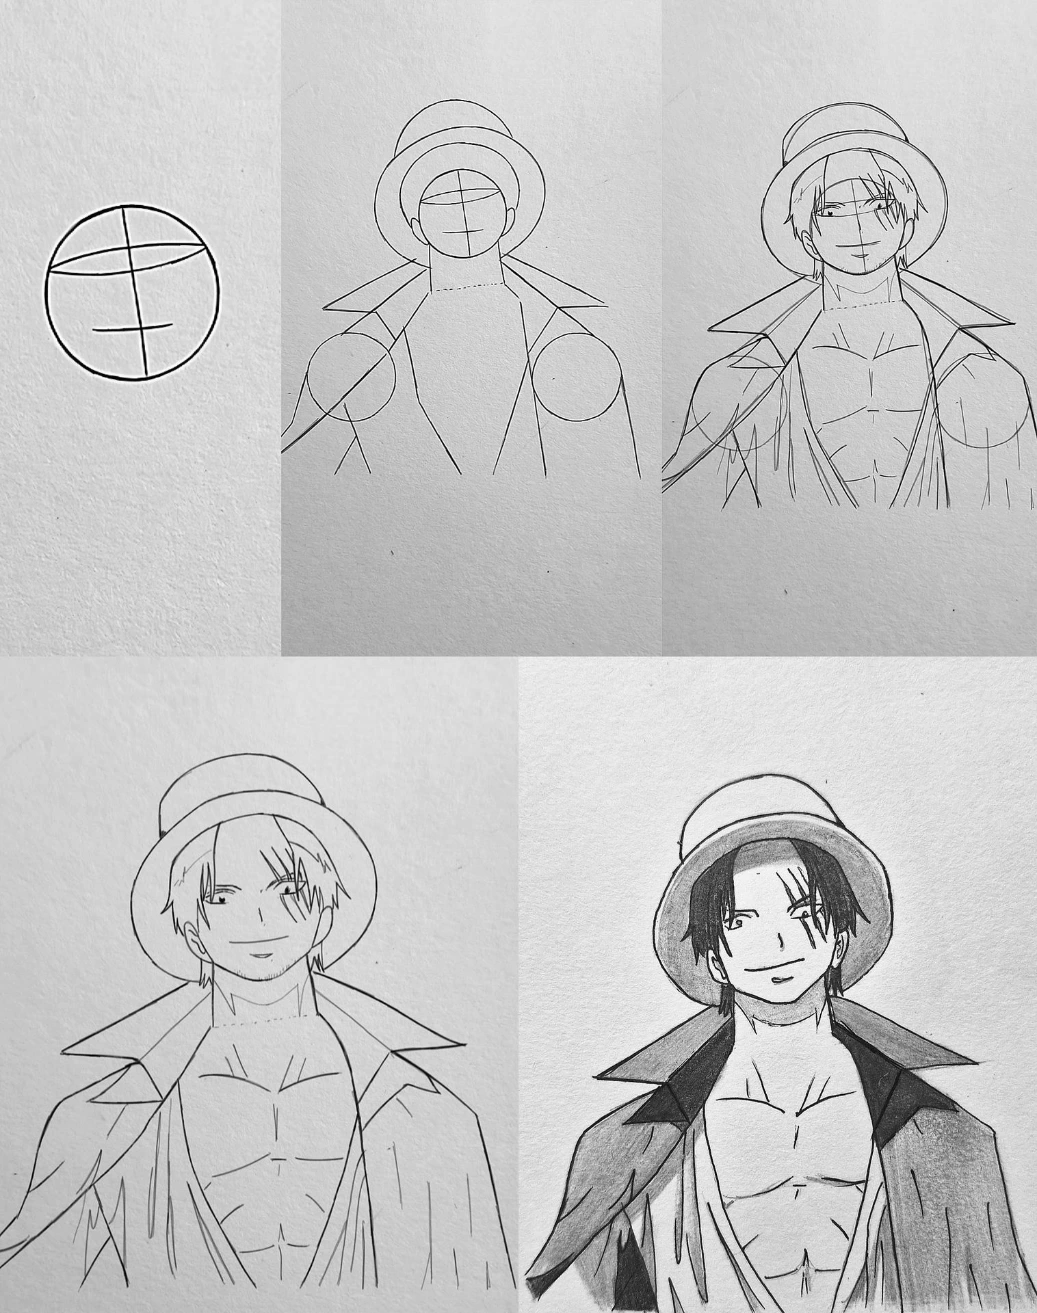
This step-by-step drawing tutorial beautifully demonstrates the complete upper-body construction of Shanks from One Piece. The process focuses on building strong structure first, then gradually refining features, clothing, and shading to achieve a polished and dimensional anime portrait.
Step 1 – Establishing the Head Foundation
The drawing begins with a simple circle, which serves as the foundation of the head. A vertical guideline is drawn down the center to determine facial symmetry, while a horizontal guideline crosses the circle to mark eye placement and indicate the tilt of the face. The horizontal line is slightly curved, subtly suggesting perspective and giving the head a natural orientation rather than a flat front view. This foundational stage is crucial because it ensures balance and correct facial alignment before any details are added.
Step 2 – Constructing the Hat and Upper Body Framework
Once the head base is complete, Shanks’ iconic wide-brimmed hat is sketched around the circle. The brim wraps around the head with a slight curve, showing depth and dimension. The crown of the hat rises above the head shape, giving it volume. Below the head, two vertical lines form the neck, slightly widening toward the shoulders to show strength. Circular shapes are placed on both sides to represent shoulder joints. From these, angled lines extend outward to sketch the dramatic, open coat collar. The collar is drawn with sharp triangular shapes that immediately establish his recognizable silhouette. At this stage, the torso is lightly blocked in using simple lines to define chest width and posture.
Step 3 – Refining Facial Features and Hair
With the framework complete, facial features are added carefully. The eyes are positioned along the horizontal guideline, drawn with a calm yet confident expression. His eyebrows are relaxed, enhancing his composed demeanor. The nose is sketched subtly, keeping with anime styling, and a faint smile is added to reflect his charismatic personality. Most importantly, his three signature scars over the left eye are drawn clearly, slightly angled and crossing the eyebrow and eye area. His medium-length hair is then sketched falling naturally around the face. Strands overlap the forehead and extend beneath the hat brim, adding softness and realism. The hair framing helps break the symmetry and gives the portrait life.
Step 4 – Defining the Torso and Clothing Details
Attention then shifts to the torso. The chest is lightly outlined with subtle muscle definition, avoiding excessive detail but maintaining structure. His open shirt reveals part of his chest, and the inner fabric lines are drawn flowing downward. The coat drapes loosely over the shoulders, and its folds begin to take shape. The collar edges are sharpened, and lines are refined to make the garment feel layered and dimensional. Slight creases are added where the coat bends at the shoulders and along the chest area. This stage transitions the drawing from a mannequin-like form into a recognizable character portrait.
Step 5 – Cleaning the Line Art
All construction lines from earlier steps are carefully erased or softened. The final outline is reinforced with confident, clean strokes. The hat brim is clarified with smooth curves, and the underside is slightly thickened to suggest depth. Hair strands are sharpened, especially where they overlap the forehead and ears. The scars are cleaned for clarity, ensuring they stand out without overpowering the face. The coat’s edges and inner folds are defined precisely, creating a crisp and professional appearance.
Step 6 – Applying Shading for Depth and Atmosphere
Shading transforms the flat line drawing into a dimensional portrait. The first and most important shadow is placed under the hat brim, casting a soft shade across the upper face and partially over the eyes. This immediately adds drama and realism. Darker tones are applied inside the coat collar and along one side of the torso to indicate a consistent light source. The hair is shaded more heavily on one side, creating contrast and separating it from the hat. Subtle gradients are added to the coat, especially near folds and overlapping fabric, enhancing the sense of weight and texture. Light shading along the chest muscles gives form without making them overly detailed. The balance between light and dark areas creates strong visual depth.
Final Impression
By progressing from a simple circular head base to a fully shaded upper-body portrait, this tutorial clearly demonstrates the importance of structure before detail. Each step builds logically upon the previous one—starting with guidelines, adding volume, refining features, cleaning line work, and finally applying shading for realism. The result is a confident and powerful illustration of Shanks, capturing his calm authority and iconic look. The structured approach makes the process easy to follow while still producing a polished and professional anime-style drawing.